Introduction
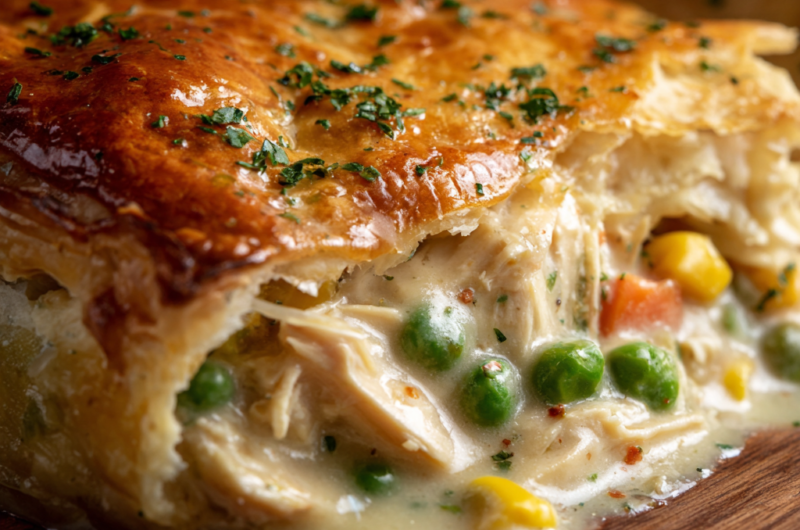
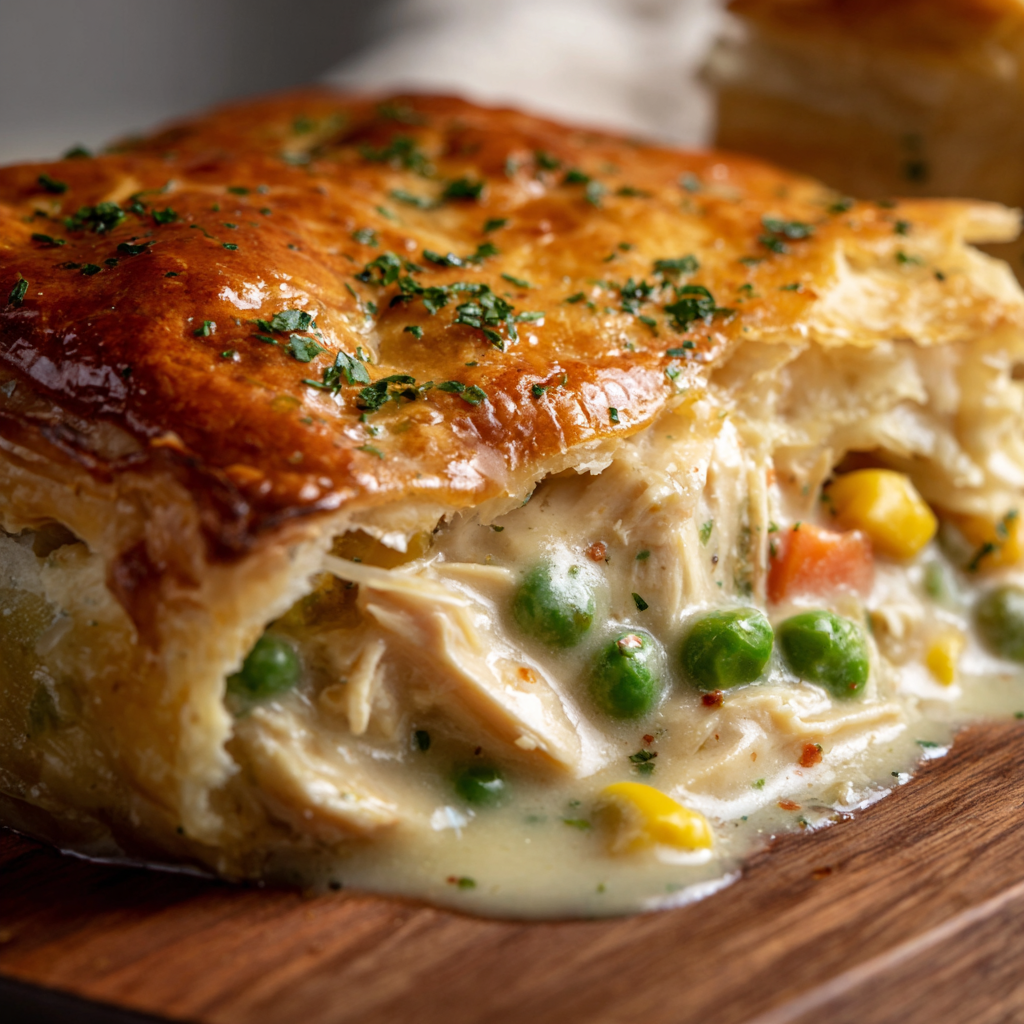
There’s something undeniably comforting about a Homestyle Chicken Pot Pie With a Flaky Butter Crust Just Like Grandma Made. The rich aroma of simmering chicken melds with herbs, while the flaky crust beckons, golden and flaky, straight from the oven. Each slice reveals tender chicken, vibrant vegetables, and a creamy filling that warms your heart and soul.
Picture this: you take that first bite, and the crust crumbles ever so softly under your fork. The savory filling is a medley of succulent chicken and sweet carrots, swimming in a velvety sauce. Just one bite, and you’re transported back to cherished family dinners, laughter echoing around the table, and the quiet joy of sharing a meal made from love.
Ingredients
- 2 cups shredded rotisserie chicken
This pre-cooked chicken saves time and brings incredible flavor and tenderness. - 1 cup mixed frozen vegetables
A colorful mix of peas, carrots, and corn adds sweetness and nutrition without the prep work. - 1 cup chicken broth
This enhances the sauce's richness, infusing each bite with savory depth. - 1/2 cup heavy cream
Adds a luxurious, creamy texture that makes the filling indulgent. - 1/4 cup finely chopped onion
Brings a mild sweetness and deepens the flavor profile of the filling. - 1/4 cup butter
A key ingredient for the roux, it ensures the filling is rich and buttery. - 1/4 cup all-purpose flour
This thickens the filling, creating that beautiful gravy we all love. - 1 tablespoon fresh thyme
An aromatic herb that elevates the entire dish with its earthy notes. - 1 teaspoon garlic powder
Enhances the savory flavor of the filling, adding warmth. - 1 teaspoon salt
Essential for balancing flavors, making every ingredient pop. - 1/2 teaspoon black pepper
Adds a subtle kick without overwhelming the comforting flavors. - 1 package (14 oz) refrigerated pie crusts
A shortcut for achieving that flaky, buttery crust without the fuss.
Directions & Preparation
Step 1: Preheat your oven to 425°F (220°C).
Start by setting the stage for perfect pie-baking. The preheated oven ensures a beautifully browned crust. You should hear a gentle hiss when the crust hits that hot surface, promising a crispy texture.
Step 2: Melt the butter in a large skillet over medium heat, then add onions.
As the butter melts, it fills the kitchen with a warm scent. Saute the onions until they turn soft and translucent—about 3-4 minutes. Watch for their lovely golden hue.
Step 3: Stir in the flour, garlic powder, thyme, salt, and pepper.
This roux will thicken your filling. You'll notice a rich aroma forming as the spices bloom with the heat. Cook for another minute, stirring constantly.
Step 4: Slowly whisk in the chicken broth and cream until smooth.
As you whisk, be mindful of any lumps; the mixture should become thick and creamy. Let it come to a gentle simmer, watching for a few bubbles breaking the surface.
Step 5: Add the chicken and mixed vegetables, stirring well to combine.
This is where the filling comes to life, with colorful veggies and tender chicken creating a hearty blend. Allow it to bubble gently for a few minutes so the flavors meld.
Step 6: Remove from heat and spoon the filling into a pie crust.
Carefully transfer the luscious filling into the pie crust; you’ll see how vibrant and inviting it looks. Make sure to get every drop of that creamy goodness.
Step 7: Lay the second pie crust over the filling, sealing the edges and cutting slits on top.
This is the final touch! Sealing the edges keeps all that deliciousness inside. Watch for the crust to puff and become golden in the oven.
Step 8: Bake for 25 to 30 minutes, or until the crust is golden brown.
Keep an eye on it! The kitchen will fill with delightful smells as it bakes. You’ll know it’s ready when the crust turns a lovely golden color.
Step 9: Let the pie cool for about 10 minutes before serving.
This resting time allows the filling to set a bit. The first slice may not hold perfectly, but the wait is worth it when you dig in!

The Importance of Using Rotisserie Chicken
Using shredded rotisserie chicken not only saves plenty of time but also adds remarkable depth of flavor. This pre-cooked protein is tender and seasoned just right, ensuring each bite is filled with savory goodness. Plus, it absorbs the creamy filling beautifully, allowing for a richer experience.
Why a Flaky Crust Makes All the Difference
The flaky butter crust isn’t just a vessel; it’s an essential part of the dish. That satisfying crunch complements the creamy filling perfectly, creating a beautiful textural contrast. When made with real butter, the crust achieves that mouthwatering flavor that lingers long after the last bite.
How to Choose the Right Vegetables
While frozen mixed veggies do the trick, consider choosing fresh ones if you have time. Carrots, peas, and green beans add vibrancy and texture to your pot pie. Fresh vegetables also impart a subtle sweetness that balances the savory filling, elevating it to a whole new level.
FAQs
What can I use if I don’t have fresh thyme?
Dried thyme works great too! Use about one-third of the amount since dried herbs are more concentrated.
What if my filling feels too runny?
If your filling is too runny, try whisking in a bit more flour to thicken it while cooking over low heat until it reaches your desired consistency.
Can I use homemade pie crust instead of store-bought?
Absolutely! A homemade pie crust can elevate the dish, giving it that extra special touch and flavor.
How do I know when my pie is done?
Your pie is done when the crust is golden brown and the filling is bubbling through the slits you cut on top.
What if I want to add more veggies to my pie?
You can easily add diced potatoes or fresh herbs like parsley for added flavor and crunch.
Can I make this a gluten-free meal?
Yes, you can substitute the all-purpose flour with a gluten-free flour blend and use a gluten-free pie crust.
Conclusion
This Homestyle Chicken Pot Pie With a Flaky Butter Crust Just Like Grandma Made invites you to gather around the table and create lasting memories. It’s not just a dish; it’s a warm hug on a plate, a celebration of comfort food that soothes the spirit and fills the belly.
I hope this recipe becomes one of your cherished family favorites, just like it has for so many others. So roll up your sleeves, grab your ingredients, and let’s cook up some love in the kitchen today!
Recipe Card
Homestyle Chicken Pot Pie With a Flaky Butter Crust
Ingredients
Method
- Preheat your oven to 425°F (220°C).
- Melt the butter in a large skillet over medium heat, then add onions.
- Stir in the flour, garlic powder, thyme, salt, and pepper.
- Slowly whisk in the chicken broth and cream until smooth.
- Add the chicken and mixed vegetables, stirring well to combine.
- Remove from heat and spoon the filling into a pie crust.
- Lay the second pie crust over the filling, sealing the edges and cutting slits on top.
- Bake for 25 to 30 minutes, or until the crust is golden brown.
- Let the pie cool for about 10 minutes before serving.
Notes
Notes
Additional serving suggestions: pair with a crisp salad, garlic bread, or roasted seasonal vegetables for balance.
For make-ahead, prep components separately and assemble just before heating to preserve texture.
Taste and adjust with acid (lemon/vinegar) and salt right at the end to wake up flavors.