Introduction
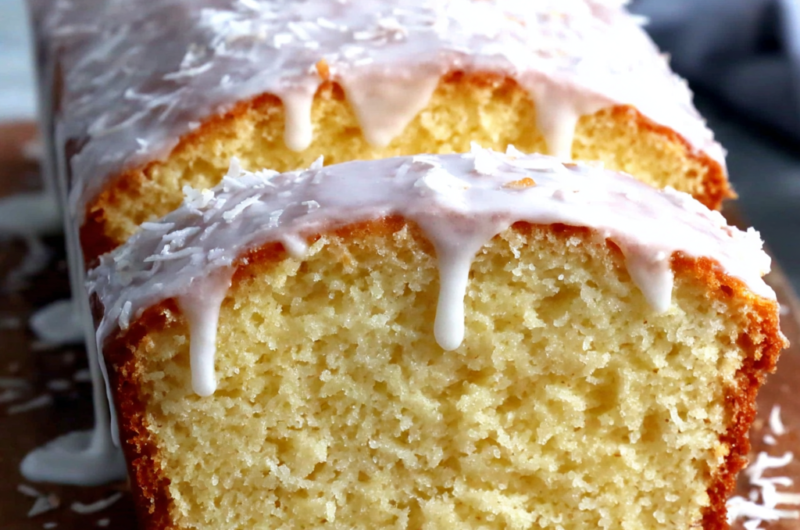
Coconut pound cake is a timeless delight that perfectly balances rich flavor with a moist texture. This version, infused with coconut milk, elevates the classic recipe into a tropical indulgence. Ideal for gatherings or a sweet treat at home, the cake’s flavor truly shines through simplicity and fresh ingredients.
Coconut milk brings a smooth, creamy element that enhances the cake's richness while the coconut adds delightful flecks of texture and an unmistakable aroma. The result is a cake that feels as luxurious as it tastes, making it a centerpiece worthy of any dessert table.
Ingredients
- 1 ½ cups all-purpose flour
Provides the structure and body for the cake, allowing it to rise properly. The gluten in the flour aids in creating a fine crumb. - 1 cup granulated sugar
Adds sweetness and contributes to the cake's moistness by hygroscopic properties, helping to retain moisture. - ½ cup unsalted butter, softened
Incorporates richness and flavor, while also aiding in the cake's structure and moisture content. - 1 cup coconut milk
Imparts a rich coconut flavor and moisture, contributing to a dense yet tender crumb. - 3 large eggs
Bind the ingredients together, providing structure and stability, which is crucial for a pound cake. - 1 teaspoon baking powder
Acts as a leavening agent, helping the cake to rise and achieve a light texture despite its density. - 1 teaspoon vanilla extract
Enhances the overall flavor profile and adds depth to the sweetness of the cake. - ½ cup shredded unsweetened coconut
Adds texture and an intensified coconut flavor, providing delightful coconut morsels throughout the cake. - Pinch of salt
Balances the sweetness and enhances the flavor, ensuring all the ingredients work harmoniously.
Directions & Preparation
Step 1: Preheat the oven to 350°F (175°C) and prepare the pan.
Preheating the oven ensures even baking from the start, which is crucial for the rise and texture of the cake. Grease and flour a loaf pan or line it with parchment paper to prevent sticking, facilitating easy removal after baking.
Step 2: In a large mixing bowl, cream together the softened butter and sugar until light and fluffy.
This step incorporates air into the batter, which is vital for achieving a light and tender crumb. Be sure to beat the mixture well; it should become pale and fluffy, indicating that enough air is trapped.
Step 3: Add eggs one at a time, mixing well after each addition, then incorporate the vanilla extract.
Adding eggs one by one ensures they emulsify fully into the batter, creating a uniform mixture. This stage also contributes to the cake’s moisture and richness, enhancing its overall flavor.
Step 4: In a separate bowl, whisk together the flour, baking powder, and salt.
Whisking the dry ingredients together helps to evenly distribute the baking powder and salt throughout the flour, avoiding any lumps and ensuring a consistent rise.
Step 5: Gradually add the dry mixture to the wet ingredients, alternating with coconut milk, starting and ending with dry ingredients.
This alternation prevents the batter from becoming too dense and encourages a smooth mixture. Mixing gently helps to retain the air incorporated during the creaming process.
Step 6: Fold in the shredded coconut, being careful not to over-mix the batter.
Folding gently incorporates the coconut without deflating the batter, preserving the lightness you’ve created. The coconut will add delightful texture and enhance the cake’s flavor.
Step 7: Pour the batter into the prepared loaf pan and smooth the top with a spatula.
Smoothing the top helps to ensure even baking and a neat appearance. This step also aids in preventing the formation of a dome on the cake during baking.
Step 8: Bake in the preheated oven for 60-70 minutes, or until a toothpick inserted into the center comes out clean.
Baking for the right amount of time is essential for a good texture. If the toothpick pulls out wet batter, the cake needs more time; too dry indicates overbaking.
Step 9: Remove from the oven and allow to cool in the pan for about 10 minutes before transferring to a wire rack.
Cooling in the pan lets the cake firm up, making it easier to remove without breaking. Transferring to a wire rack ensures that air circulates around the cake, preventing sogginess.
Step 10: Once cooled, slice and serve as desired, optionally topping with whipped cream or toasted coconut.
Serving the cake cool maximizes flavor and texture, allowing it to shine on its own or with elegant accompaniments. Toppings can elevate the dessert experience and add a visual appeal.

The Importance of Creaming Butter and Sugar
Creaming butter and sugar is a critical step in baking, as it incorporates air into the dough, resulting in a lighter texture. This process not only helps the cake rise but also creates a uniform structure that holds its shape. When done properly, it makes for a delightful eating experience by contributing to the cake’s tender crumb.
Choosing the Right Coconut
For this recipe, opt for unsweetened shredded coconut to avoid unnecessary sugar and maintain that authentic coconut taste. Sweetened coconut can dominate the flavor, altering the balance of sweetness. Using unsweetened varieties allows the natural flavors to shine through, creating a well-rounded coconut experience.
Frosting Ideas to Complement Coconut Flavors
While this coconut pound cake is delightful on its own, pairing it with a light frosting can enhance the experience. A coconut whipped cream or a light glaze made from coconut milk can tie in the flavors beautifully. For those craving a contrast, a tart lime glaze also offers a refreshing complement to the rich coconut profile.
FAQs
What should I do if my cake doesn't rise as expected?
Ensure your baking powder is fresh and hasn't expired, as old leavening agents can affect rise. Additionally, over-mixing the batter can lead to dense texture.
Can I use sweetened shredded coconut instead of unsweetened?
While you can use sweetened coconut, it will alter the sweetness level of your cake, possibly making it overly sweet. It's best to stick with unsweetened for balanced flavors.
What if my batter appears too thick?
If your batter is too thick, add a bit more coconut milk, one tablespoon at a time, until the desired consistency is reached. This will help achieve a smoother batter.
How can I tell if my cake is properly baked?
The cake is done when a toothpick inserted in the center comes out clean or with a few moist crumbs. If it pulls out wet batter, allow it to bake longer.
Can I scale the recipe for a larger cake?
Yes, you can double the ingredients for a larger cake. Just ensure to use an appropriately sized pan and adjust the baking time.
Why did my cake turn out dry?
Dryness can result from overbaking or not using enough fat. Make sure to check for doneness early and measure butter accurately.
Conclusion
This coconut pound cake, infused with coconut milk, is a testament to the joy of baking with natural ingredients. Its moist texture and delightful flavors make it a perfect choice for any occasion.
Whether enjoyed plain or dressed up with festive toppings, this cake is sure to impress friends and family alike. Give it a try and bring the tropical flavor into your home baking repertoire.
Recipe Card

Delightful Cornbread Waffle Bites Perfect for Snacking
Ingredients
Method
- Preheat your waffle iron according to the manufacturer's instructions.
- In a mixing bowl, whisk together the cornmeal, flour, baking powder, and salt.
- In a separate bowl, combine the milk, egg, and melted butter, whisking to combine.
- Pour the wet ingredients into the dry mixture and stir until just combined.
- Lightly grease the waffle iron with cooking spray or brush it with oil.
- Spoon the batter into the preheated waffle iron, filling it about halfway full.
- Close the waffle iron and cook according to the manufacturer's instructions, typically for about 3-5 minutes.
- Remove the waffle bites from the iron and repeat with the remaining batter.
- Serve warm with honey or maple syrup, if desired.
Notes
Additional serving suggestions: pair with a crisp salad, garlic bread, or roasted seasonal vegetables for balance.
For make-ahead, prep components separately and assemble just before heating to preserve texture.
Taste and adjust with acid (lemon/vinegar) and salt right at the end to wake up flavors.